Using the KhanPay dashboard
The KhanPay dashboard displays information on transactions processed or attempted through the payment gateway.
The dashboard allows users to:
- Search for and display details of successful and failed transactions
- Download transaction details to Excel
- Manually refund successful transactions
Getting started
In order to access the dashboard, open the following URL in your browser:
https://ap-gateway.khanpay.kz/server/dispatcher/v2/operations.seam
Before logging in, you can select your preferred language (English or Russian) in the top right-hand corner of the screen.
- In order to log in, enter your KhanPay username and password. (Sent by KhanPay colleagues)
- Searching for transactions
1. Searching payments
The system should automatically open to the transaction search page. If not, select "Operations” -> “Transactions" in the menu bar to open the transaction search page:
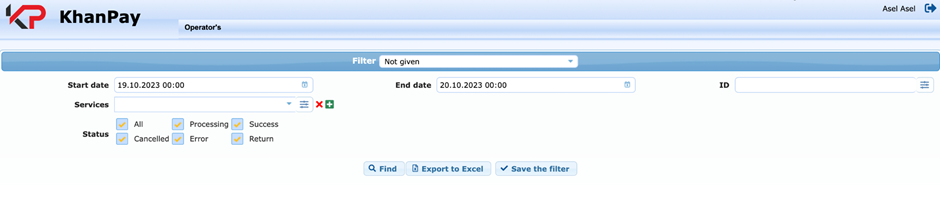
To search for transactions, specify one or more of the following search parameters:
Start date & End date — the period within which the transaction(s) took place. The time zone is UTC. By default, “start date” is set to 18.00 UTC yesterday, and “end date” is set to 18.00 UTC today.
Transaction ID: the KhanPay transaction ID. This is the unique ID number that the KhanPay gateway assigned to the transaction. It is possible to specify multiple transaction IDs, separated by a comma "," or a semicolon ";". When you search by ID, all other search parameters are ignored, with the exception of transaction status. In other words, if the transaction occurred outside the selected date range or on another service than the one specified, the system will still identify it.
Merchant transaction ID: this is the original transaction ID specified by the merchant when passing the transaction to the gateway. It is possible to specify multiple terminal IDs, separated by a comma "," or a semicolon ";". When you search by terminal ID, all other search parameters are ignored, with the exception of transaction status.
Services: the KhanPay service (channel) through with the transaction was processed. To select several services at once, click the "+" button, select a service from the list in the pop-up, and click the "Add" button. To delete the added service, click the "Delete" icon in the last column. To clear the list of selected services, click the "Delete everything" button.
Status: the latest status of the transaction in the payment gateway. Options are:
- All: all transactions that match the selection criteria (date and service);
- Cancelled: cancelled (refunded) payments;
- In progress: transactions that are currently in progress;
- Error: failed transactions;
- Success: successful transactions;
- Refund: payments that are refunded, chargeback.
After selecting the required search criteria, click the “Search" button. The system will return the following data for all transactions that meet the search criteria:

- No.: the row number of the transaction;
- Transaction ID: the unique ID number that the KhanPay gateway API assigned to the transaction;
- Server time: transaction processing date and time (time zone UTC). For refunded transactions, “Server time” represents the date
and time of the original transaction; - Status: original transaction status (“success” or “error”);
- Substatus: additional information about the status of the payment (successful, failed, cancelled/refunded, etc.);
- Card number: (masked) card number related to the transaction;
- Merchant transaction ID: the original transaction ID specified by the merchant when passing the transaction to the gateway;
- Service: the KhanPay service (channel) through with the transaction was processed;
- Point: the unique four-digit code assigned to the merchant by the system;
- Amount: the amount of the transaction;
- Currency: the currency of the transaction:
- Error description - additional information assigned to a failed transaction, which can further help identify the cause of the error.
2. Downloading transaction reports
The system also provides the ability to download transaction data in MS Excel format (.xlsx). To do this, click the “Export to Excel” button:

Use the dialog box to select the required fields (columns) to be added to the report:
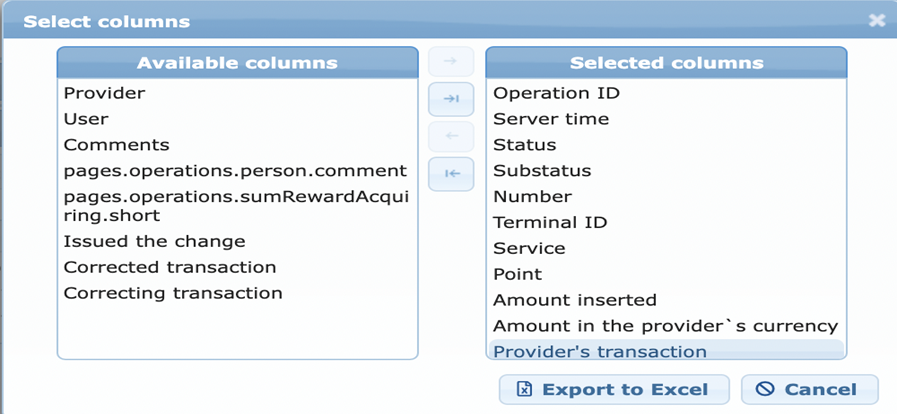
After selecting the columns to be included in the report, click “Export to Excel”. The system will prepare the Excel report and downloading should start automatically depending on your browser settings.
3. Manually creating a refund via dashboard KhanPay
To refund a successful transaction, first search for the transaction using the search functionality described above. Once you have located the transaction to be refunded, click the information button for that transaction:
![]()
A pop-up window will open with additional information on the transaction. In order to refund the transaction, click the “refund request” button on the left-hand side of the pop-up. This will send a refund request to the acquirer for that transaction. If the refund is successful, then the “substatus” in the KhanPay dashboard will change from “Success” to “Cancelled”.
![]()